CPlay List Editor is a Java application that
I wrote to generate play lists for the Cics Play memory player software
(or any other music player that supports cue sheets). The application will
start at any directory you specify, and add music files to lists so they
can be chosen for playlists. Playlists can be saved to be loaded at nother time,
or can be sent directly to the CPlay application.
CPlay supports cue sheets, so behind the scenes this application will write to
a cue sheet which is then automatically sent to CPlay.
This application is only useful if you have ripped your CDs to individual music files
per song, and if you have a directory structure something like
Library Root\Artist 1\Album 1
Library Root\Artist 1\Album 2
Library Root\Artist 2\Album 1...
or
Library Root\Genre\Artist 1\Album 1
Library Root\Genre\Artist 1\Album 2
Library Root\Genre\Artist 2\Album 1...
The program currently supports WAV, FLAC, MP3, and APE file types. You can choose to
read embedded tags in FLAC and MP3 files where available instead of having the application attempt to
discern the tags from the file system directory structure.
Directions
- Set settings accordingly in the Settings menu (see below).
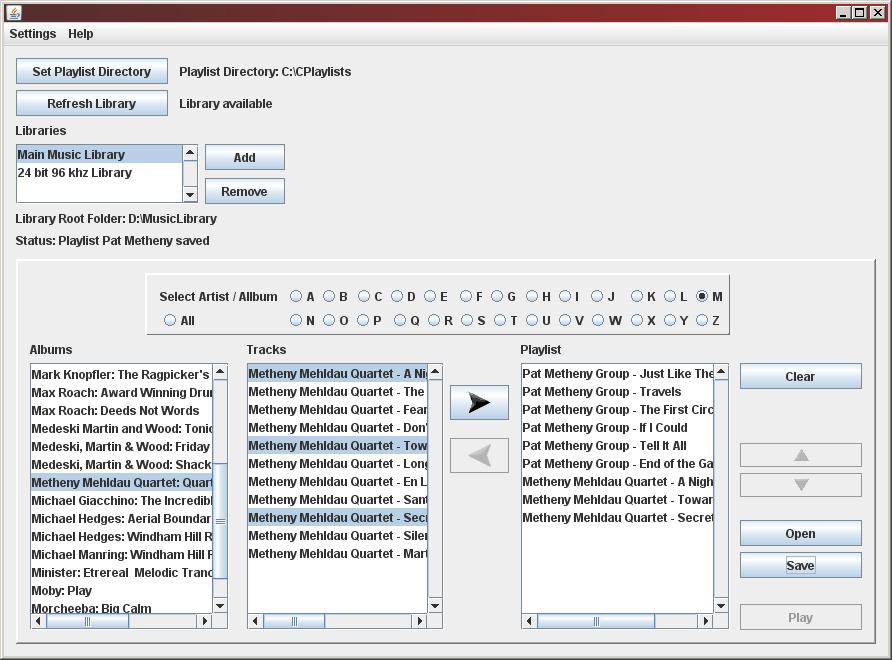
- Press the "Set Playlist Directory" button and choose or create a directory to store your play list files.
- Next to the empty "Libraries" list, press the "Add" button and browse to the root folder of your music library,
then give the library a name. The application will show status as it searches through
your music directory. If successful, you can then choose artists / albums to populate into the
Album list by selecting the beginning letter of the artist's name in the Alphabet
radio button box.
- Selecting an item in the Album list will populate the Track list.
- Selecting one or more tracks in the Track list will enable the Right Arrow
button that will copy any selected tracks into the Playlist list.
Double clicking on a track in the track list will also send it to the play list.
- Build a playlist of tracks by different artists and albums by repeating the process.
- Change the order of tracks in the Playlist list by selecting a track and clicking
the Up Arrow or Down Arrow buttons.
- When you have all the tracks as you want them in the Playlist list,
you can save the playlist by clicking on the Save button and choosing a
name for your new play list. The application will automatically give a ".cue"
file extension if you type in a name and skip the ".cue" extension. You can
also choose to overwrite an existing play list if one exists. The status
label will show that the play list has been saved if successful. The play list
is now available to be opened in CPlay.
- If you have set the setting to send play lists to CPlay (see below), pressing the
play button will attempt to open CPlay with the playlist loaded within. Play lists
don't have to be saved first, but save the playlist if you will want to load it another time.
Please note that only one instance of CPlay can be run at a time, so be sure
that CPlay is not already running before pressing the play button. If you start
CPlay by pressing the Play button, and press Play again after
changing the playlist, the current running instance of CPlay will be destroyed
and a new instance will be created. This will work as long as you haven't stopped
and restarted the CPlayList Editor application or the CPlay application.
- Press the Load button to load up an existing play list for editing or playing within CPlay.
Libraries List
If you keep your music under different top-level folders on your hardrive, you can
add a Library to the Libraries list for each top-level folder and give each Library
its own name. Reasons for keeping separate libraries might be that you want to keep
music captured at a 96 kHz separate from music captured at a 44.1 kHz sampling rate,
or you might want to keep WAV files separate from FLAC files. To add a library, press
the Add button next to the Libraries list. A dialog box will appear, by which
you can choose the top-level folder where your music is located. After choosing the folder,
another dialog box will appear asking you to name the library.
The program will cache the library between sessions, but if you ever add more music to a
library, you can add the new music by selecting that particular library in the Libraries
list and pressing the Refresh Library button. The application will reread all the folders
in that library add any music found.
You can remove a library by selecting a library from the Libraries list and pressing the
Remove button.
You can build a single playlist out of songs from multiple libraries if you wish.
Settings
- Remove Track Number and File Extension from Track Title:
This option will attempt to remove the trailing file extension and
leading track number from the Track Title field. When this
option is used in conjunction with the Use Embedded Tags when Processing
FLAC and MP3 option, only files that do not contain embedded tags
will be affected.
- Parse Artist and Album from a Single Parent Folder:
Use this option if you set up your music library using single folders
named similar to Artist Name - Album Name. When setting this option,
a dialog box will appear asking you to enter the characters that separate
artist from album title. When you answer, make sure you enter blank spaces
as well as other seperator characters. For example, lets say one of your
folders containing songs was named Pat Metheny Group - The First Circle,
you would enter " - " (space dash space without the quotes). The application will
attempt to set the Artist and Album Title fields from the single folder name.
- Show FileType in Track List: Use this option if you want to see the
type of music file (wav, flac, mp3, ape) in the Tracks list. This option will
prepend the file type to the track name. Some people mix
different type of files in the same music library, but CPlay will only play
FLAC and WAV files. If you have other file types, you can see them in the track
list using this option, so you don't inadvertantly add MP3 files to a CPlay playlist.
- Enable Sending Playlists to CPlay: Clicking this option will
bring up a file chooser dialog box with which you should browse to and select
the CPlay.exe file in your file system. By default, this file can be found at
C:\Program Files\cics Play\cicsPlay.exe. This will enable the Play
button so that play lists can be sent directly to CPlay without being saved first.
- Use Embedded Tags when Processing FLAC and MP3: By default,
the application will determine the cue sheet information from the music
library directory structure and file names. Check this option if you
would like the application to attempt to use information from the tags
embedded in FLAC and MP3 files instead of folder and file names. This
option will increase processing time quite a bit because some flac files
contain album art as well. If there is an error reading from the
embedded tags for a specific music file, or if the tag is not available,
the application will revert to using folder and file names to get information
for that music file. Note that the application does not read embedded tags
from APE nor WAV files.
- Title Tracks "Artist - Title":
When reading embedded tags from FLAC and MP3 files, this option will
set the track title to Artist - Title so that the artist will
show up in the play list.
- Show Sampling Rate when Reading Embedded Tags: Use this option
if you want to prepend the file's sampling rate to the track name in the Tracks list.
Notes
- The application will remember your settings from the last time you
ran it. It will also remember your music library, so you only need to
reread your music library when music has been added or removed.
- The only way for these play lists to work as cue sheets is to use
absolute paths in the cue sheets. This means that applications
that have trouble with absolute paths in cue sheets will also have trouble
with the play lists generated in this application.
- Because some people have a single directory for all music, the application will
write a relative cue sheet if the Playlist Directory is set to the same folder where
the music files are found.